


tunafoot
-
Posts
97 -
Joined
-
Last visited
-
Days Won
28


-
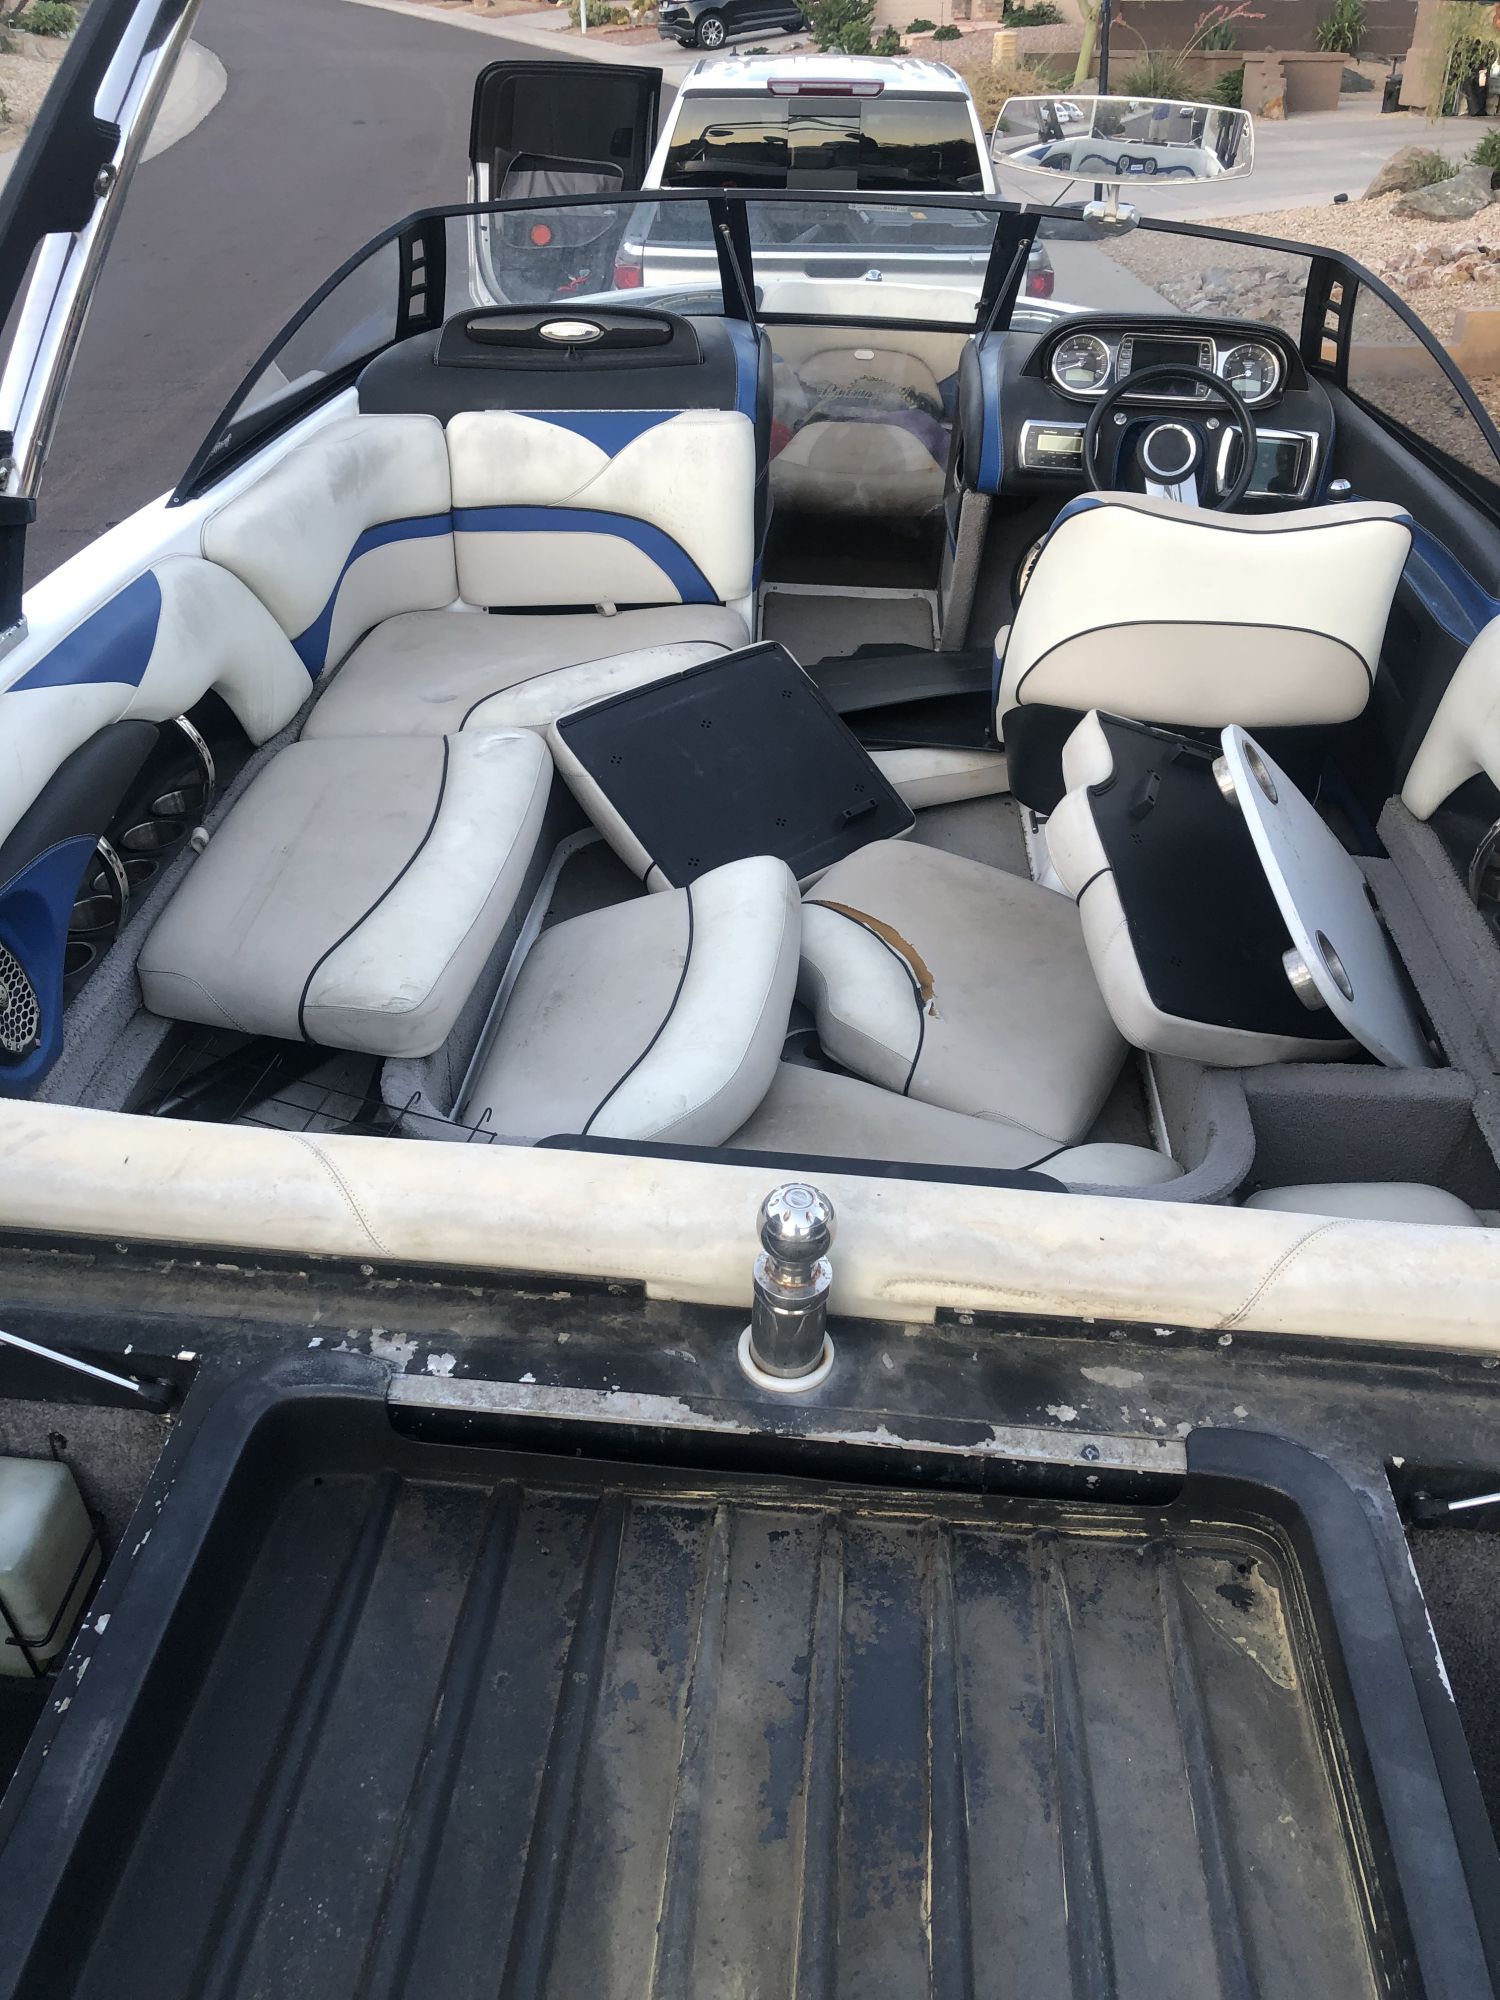
 Im re-doing the upholstery and wanted to add the "Stomp pads" to the seats like the newer boats have. The middle seat gets tons of abuse from people getting in and out of the boat. I could tell by the staples that were used it had already had a new skin installed once and was already torn and ready to be replaced for its second time in 11 years. After taking off the cover, I used a electric bread knife to cut out the foam. I used 2 pieces of HDPE stapled (1" thick black and 3/4" white) to make the solid bases. After attaching the HDPE, I put the new cover on the sundeck. I mounted the 1/4" aluminum plate on the outside of the cover. Then I covered the aluminum plate with some leftover EVA foam I had from another project. Then I did the same procedure for the lower seat. The gap in the black HDPE will allow a space for the welt to sit so it wont have a bump when I attach the aluminum plate. I felt like it was too large of a height difference from the top of the bolster foam to the HDPE so I cut the foam at a 45 degree angle. This allowed the cover fit back on with minimal wrinkles. you can see the new marks that were needed to remove some of the extra black material. The white material was fine and didn't need any material removed. I used the old seat cover to make a new pattern and glued the vinyl to 1/4" scrim foam, then sewed it together. Im really happy with how it came out. Its so much better getting in and out of the boat now. No need to remove your shoes and it makes it look like a newer boat.
 -
nice job. I had a 2013 21' VLX with factory surfgates and I dont think my wave ever looked as good as yours does.
-
Carpet replacement for 2002 Malibu VLX
tunafoot commented on tunafoot's project in Flooring Upgrade Projects
The plastic lining came with the boat. Its the un-insulated (useless as a cooler) factory cooler. -
Interior and Floor update to make 2002 Malibu VLX like new
tunafoot commented on tunafoot's project in Interior Updates & Refinish Projects
I don't have a upholstery background, but it's pretty easy. There is only a couple stitches that you will need to use. You'll need a walking foot industrial sewing machine that can found on craigslist for $400-600 . The key is use marks about every 6 inches to line up the pieces and to cut an accurate pattern and if the existing vinyl has a odd curves from being stretched for years, you'll need to make the new pattern have the same odd curve so it will match how the foam has been squished. Theres some great videos on Sailrite that show you everything you need to know. -
Bought it sight unseen from a dealer in New York for $15K. I'll start a thread this week.
-
just picked up a 2013 Malibu 21' VLX Wakesetter Current projects include. removing spiders and a total restoration.

-
ADDED A WETSOUND SYSTEM WITH 4 REV 10S TO A 2008 VLX
tunafoot commented on Billy Simkins's project in Sound System Projects
nice job on the video. -
Carpet replacement for 2002 Malibu VLX
tunafoot commented on tunafoot's project in Flooring Upgrade Projects
Buy the marine grade carpet. I usually get the supplies from a local upholstery supply shop, but if you want to order it online try https://www.albrightssupply.com/ -
On the project you had with your 2002 Malibu, the surf gates when they were closed, did you have any problems with the top of the closed gates hitting the water passing along the side of the boat? My boat is resulting in a similar design and I am concerned to continue thinking that it would be a significant issue.
-
 The orange bimini that was on it was in the way if you wanted to add tower speakers. I had a free weekend and thought I'd try to see if I could make a new Bimini top before the new owner picked up the boat. was able to reuse the stainless bars. I changed up the mounting location of the bimini bars to make the over-the-top bimini work. I used some strapping tape to hold the bars in the new position and used plastic to make a new pattern. I have never tried to make a bimini, but it came out better than I had expected. I made it about a foot longer than before. You can never have enough shade in Arizona.
 -
Fixing Gel Coat Spider Cracks 2002 Malibu VLX
tunafoot posted a project in Fiberglass & Gelcoat Projects
 I found a bunch of spider cracks on the bottom of the boat. I have no idea how long they had been there. Looks it had been awhile and I didnt check under the boat when I bought it. At this point I had taken a deposit from I guy that bought it from California sight unseen.. I didn't want to sell it to the next guy in this shape so I figured I'd fix the cracks before he picked it up I ground out the cracks using a Dremmel tool, then filled the cracks with color matched gelcoat material from Spectrum Color. Malibu had used two different colors of white in 2002. "Moon Beam" or "Bright White" MALIBU BRIGHT WHITE (OPAL) I couldn't find a Malibu color chart so I took a chance and ordered a quart of the bright white. I didn't snap any pics of the repair process but what I did was use a layer of masking tape around the cracks to keep from sanding into the existing gelcoat. I used a paint brush to fill the crack with as much gelcoat as I could get in there. The gelcoat is pretty runny and you aren't able to get much to stick with it being on the underside of the boat. In hindsight I should have used plastic to help force it into the crack. I keep thinking that one more coat with a paint brush would do it...I ended up filling and sanding it 10 times. For the final finish I sanded with 180, 300 1000, 1500 grit and then used a polisher with Meguiars Mirror Glaze #49 Oxidation Remover to buff to a shine.
 -
 edit: This project followed the interior replacement project found here: While pulling out the seats I found out the carpet was so much worse than I had originally thought. This was about the same time I had found a good deal on a newer Tige Z3. I ended up buying the Tige and was now the owner of two boats. My wife thought I should just sell the Malibu and stop dumping money into it, but I had come this far and the old girl deserved some new carpet. I did the carpet over the 4th of July holiday. Phoenix gets stupid hot in the summer, but it was only 108 degrees that day. Almost bearable with the assistance of my shade fort that I made with a boat cover and an EZup. The existing carpet pulled up pretty easy but left a layer of glue that was crazy sticky. I used a hot gun and a trowel to remove as much as I could, but when I did a test fit it screwed-up some of the carpet when I tried to pull the carpet back out and some of the carpet fibers got stuck in the glue. To overcome the sticky problem, I put down a temporary layer of plastic. I ended up leaving the existing carpet under the port side seats as it was in relatively good shape and it allowed me to not have to use the bit of carpet that got ruined. Carpet install was pretty straight forward. I glued down the carpet it 3'-4' sections using contact cement. It took all day and my head was spinning from the fumes, but it came out really nice. It was definitely worth the effort, now it feels like a new boat.
 -
 The interior was in pretty good shape for a 16 year old boat. The part that really bugged me was that the sun deck was spray painted by the previous owner to try to hide a cigarette burn that he tried to fix. Also wasnt a big fan of the orange welting. There were also a couple seat covers that had been replaced and didn't match the rest of the boat. I wasn't able to find material that matched the factory upholstery, so I decided to swap out the perforated material for a light grey. But after seeing how bad the old seats really were I opted to do the entire boat. The seats were a lot more work than I had expected. I figured it would take a couple weeks to complete, but it took the better part of 2 months of nights and weekends to finish everything. While pulling out the seats I found out the carpet was so much worse than I had originally thought. This was about the same time I had found a good deal on a newer Tige Z3. I ended up buying the Tige and was now the owner of two boats. My wife thought I should just sell the Malibu and stop dumping money into it, but I had come this far and the old girl deserved some new carpet. Entire carpet project is here: \ \
 -
 Added some surf pockets and they work awesome. So much easier than using the surf racks and should be a little easier on the boards. First I laid out the boards and outlined with chalk My DAKINE bag was already the perfect shape. Figured I'd just use it as a pattern I bought some mesh from the local upholstery shop, it was $6.95/yd. Also got some sunbrella seconds for $12.95/yd and nylon edging I ended up using a layer of sunbrella between the Bimini and a layer of mesh. I doubt the mesh will hold up as well as the sunbrella, but I had read that I might have problem with boards warping due to heat if I only used sunbrella. the extra layer of sunbrella under the boards would also help mitigate any issues I'd have with wear and tear of the factory bimini the first pocket sewn on The starboard side had a built in pocket that needed to be relocated to remain functional. Both sides done. I made one of the elastic bungee retainers a bit longer to accommodate the longer fin position on the inland surfboard The shorter bungee worked just as well with the longer board if you only capture one fin.
 -
New Ultralon Floor for 2003 VLX
tunafoot commented on jfthunder's project in Flooring Upgrade Projects
Incredible job on the floor. I just re-did the carpet on my vlx this week and it was a ton of work. I can only imagine how many hours it took to pull this off.


